
DIY Tiling
Laying Out Your Tiles
Once you have decided on your tile laying pattern, it's a great idea to learn about movement joints and dry laying before you start laying.
In this section, we run through everything you need to know about laying out your tiles before you start tiling.
Click on any topic below and we’ll take you directly to our tips. Come back to this index at any time if you need more information.
| When to dry lay | Once you have your centre guidelines ready, it's time to "dry lay" your tiles to make sure you have your layout and tile quantity correct. |
| Movement joints; what they are | Movement joints act as a stress reliever to allow fine movement between adjacent building components. |
| Movement joint placement details | Our experts run through where and when to place movement joints. |
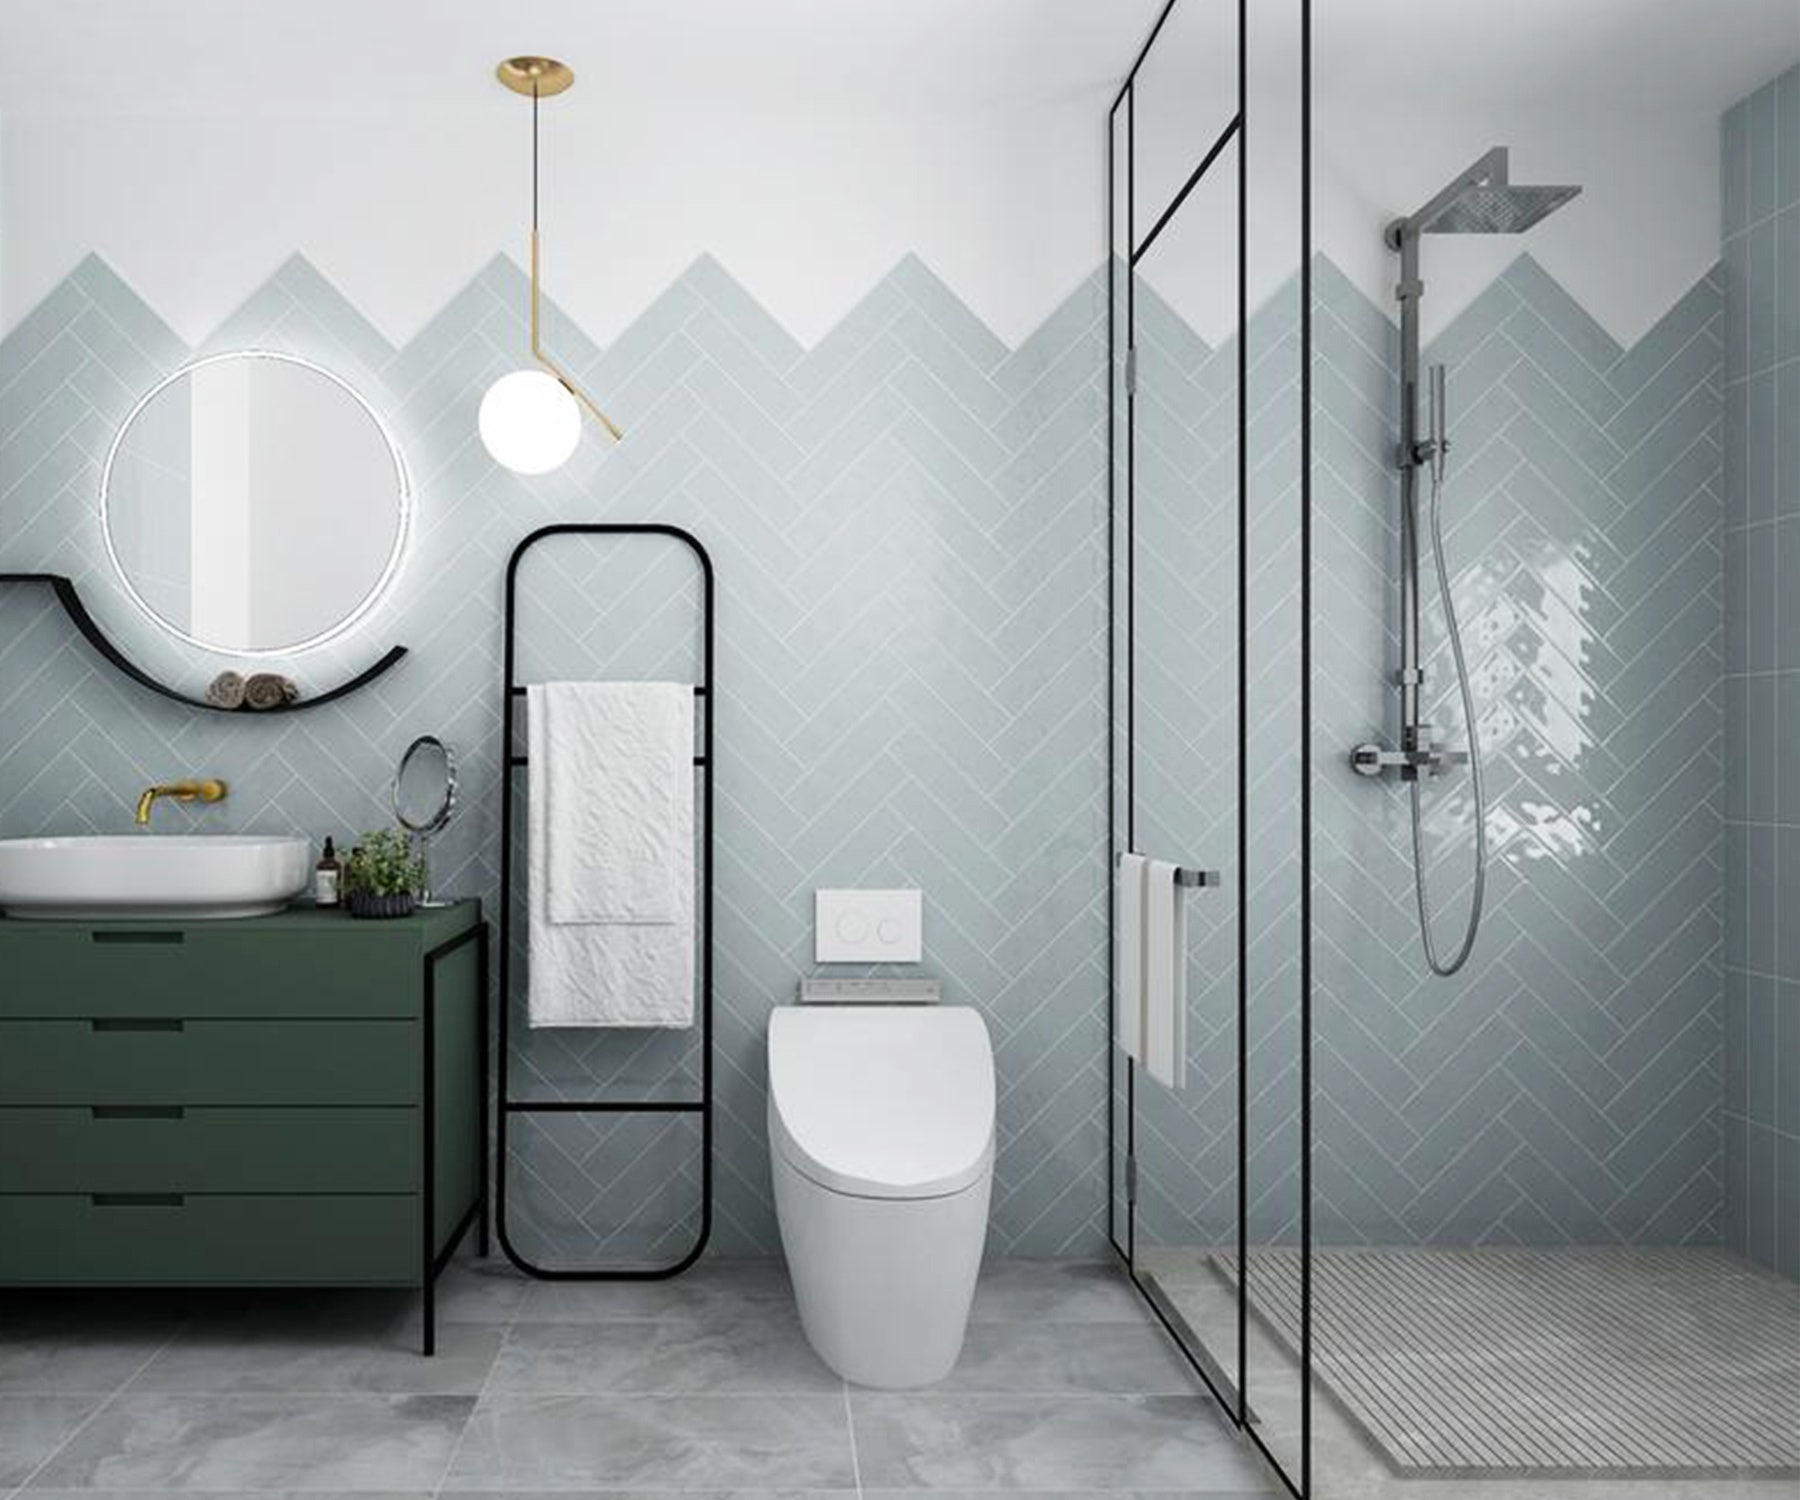
| Setting out wall tiles | Now you’ve decided on your layout, let’s get to it and start setting them out. |
| Setting out floor tiles | Our experts dish out how to set out your floor tiles so you're set up for success. |
| Setting out external areas | Our expert advice for setting out external areas and important information regarding movement joints. |
| Setting out mosaics | A good mosaic tile project requires a well-planned layout to ensure that grout seams run perfectly square. |
| Tiling around windows & doors | When tiling around windows and doors, keep your tile joints level on either side. |
| When Tiles Meet The Ceiling | When tiling to the ceiling, allow a gap for a flexible silicone joint. |
| When Tiles Meet A Carpet Area | When tiles meet a carpeted area make sure the edge isn't a tripping hazard - Beaumont Tiles has a wide range of trims to suit! |
| Grout spaces | Grout adds both a functional and decorative element to any tiling job. |
Expert tips on why you should always dry-lay your tiles before tiling and the difference tile patterns can make to your overall look and design.
As one of the most versatile wall and floor materials available, tiles give you almost limitless choices. With many options for size, shape, colour, style, finish, design and effects, there’s at least one tile to suit any style. When you get creative with laying patterns, grout colours, and tile sizes, your space becomes uniquely yours.
Our Hot Tip: Our handy How-To Guide will show you how to lay your tiles in different patterns.

When To Dry Lay Tiles
Once you have your centre guidelines ready, it's time to "dry lay" your tiles to make sure you have your layout and tile quantity correct. Dry laying helps you plan and work out any cuts you will need to make before you start fixing the tiles.
Dry laying is also important as it gives you get a chance to see how all your tiles look together and whether there are any issues you should check out before they're permanently stuck down!
The fun part of dry laying, however, is getting to play around with your tile layout - how you arrange your tiles to bring out your style and the best aspects of your space. If your tile has a high variation of V3 or V4, it's super important that the tiles are dry laid to ensure an acceptable (and fabulous!) blend and placement of colour shades - We recommend mixing from multiple boxes. Similarly, if your tile has a repeated pattern, you can ensure you have them laid out correctly for the pattern to repeat. Dry lay mosaic sheets to check the blend is acceptable and to ensure as few small cuts as possible are used and work out the easiest place to start.
Before you start tiling, it is important to check your tiles or mosaics are the ones you selected and that you have enough to complete the entire job. As tiles and mosaics are produced in batches, there is no guarantee different batches will match or that the same batch will be available in the future. That is what we always recommend ordering an extra 10% spare.
Our Hot Tip: Check out our handy download on the most popular tile laying patterns here or head to our dedicated tile laying pattern page.
Our Hot Tip: Sometimes it is not possible to align the grout joints of the floor and wall tiles perfectly so it is not uncommon to offset the grout joints to achieve a better look.
What Are Movement Joints And Why Is It Important To Know About Them When Laying Out Your Tiles?
Tiles, like most other building materials, will expand and contract with changes in temperature (think of direct sunlight onto a tiled floor). Building materials can also be affected by humidity. The substrate surfaces we tile onto can also experience some movement, such as the shrinkage in new concrete (that is why you must wait for at least 28 days before tiling on new concrete). Whilst these movements are only tiny, they can cause stresses to build up if there is no allowance made for movement when tiling.
Movement joints (also known as expansion joints) act as a stress reliever to allow fine movement between adjacent building components. They separate a tiled surface from fixed elements such as columns and walls. They are also used to subdivide large tiled areas into smaller sections to compensate for any strains that may develop in the building structure and tiling system. Without any movement joints, tiles could crack, ‘tent’ or pop up.
Most smaller residential tiling jobs will not require movement joints through the tiling apart from when making allowance for movement at the perimeter of the tiled area. A minimum of 3mm should be allowed between the edge of the tiled area and any restraining surface such as a wall. This is particularly important where narrow grout joints are used. The perimeter joint should be free from adhesive and be filled with a suitable silicone sealant, not grout or covered with a skirting board after tiling.
Tiled outdoor areas also need movement joints. Differences between summer and winter temperatures, direct sunlight and sudden temperature drops caused by rain require movement joints to be incorporated at all substrate joints and at appropriate positions of no more than 4.5 metres apart.
Larger buildings will have structural movement joins incorporated within the building and between adjacent structural elements. Joins in any underlying surface must not be tiled over but must be incorporated into the tiled area and followed through to the tile surface. They must not be grouted but have an appropriate flexible material.
Our Hot Tip: It is essential to provide for any likely movement in the structure or substrate, especially if underfloor heating is to be installed or if the room has large windows and receives strong sunlight.
Our Hot Tip: Our DIY experts have created a super handy DIY guide that will be your best friend throughout your DIY journey - click here to download.
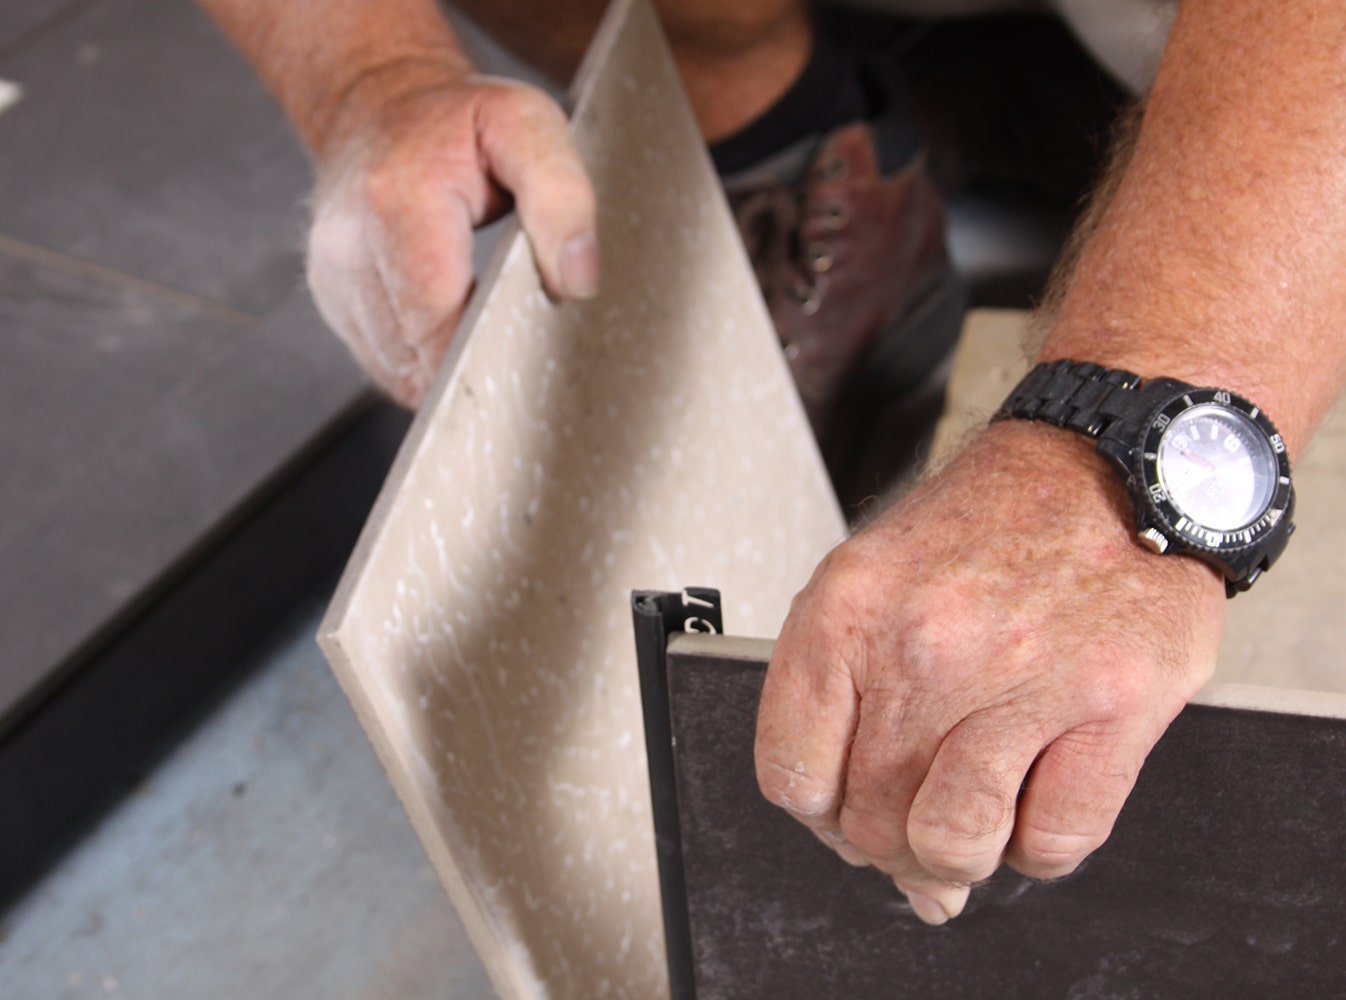
Movement Joint Placement Details
The Australian Standard recommends intermediate “stress-relieving joints” in internal tile work at 9 metre centres and in external tiled pavements at centres of approximately 4.5 metres. Movement joints should also be installed in accordance with the requirements of Australian Standard AS3958-2023. Here are our tips:
- Provide movement joints overall movement joints in the background substrate.
- At junctions between different background materials.
- At fixtures interrupting the tile surface, e.g. columns etc.
- At internal vertical corners on walls.
- At the perimeter of a floor. (Put the skirting on afterwards)
- Evenly placed at maximum 4.5-metre layouts in a grid pattern.
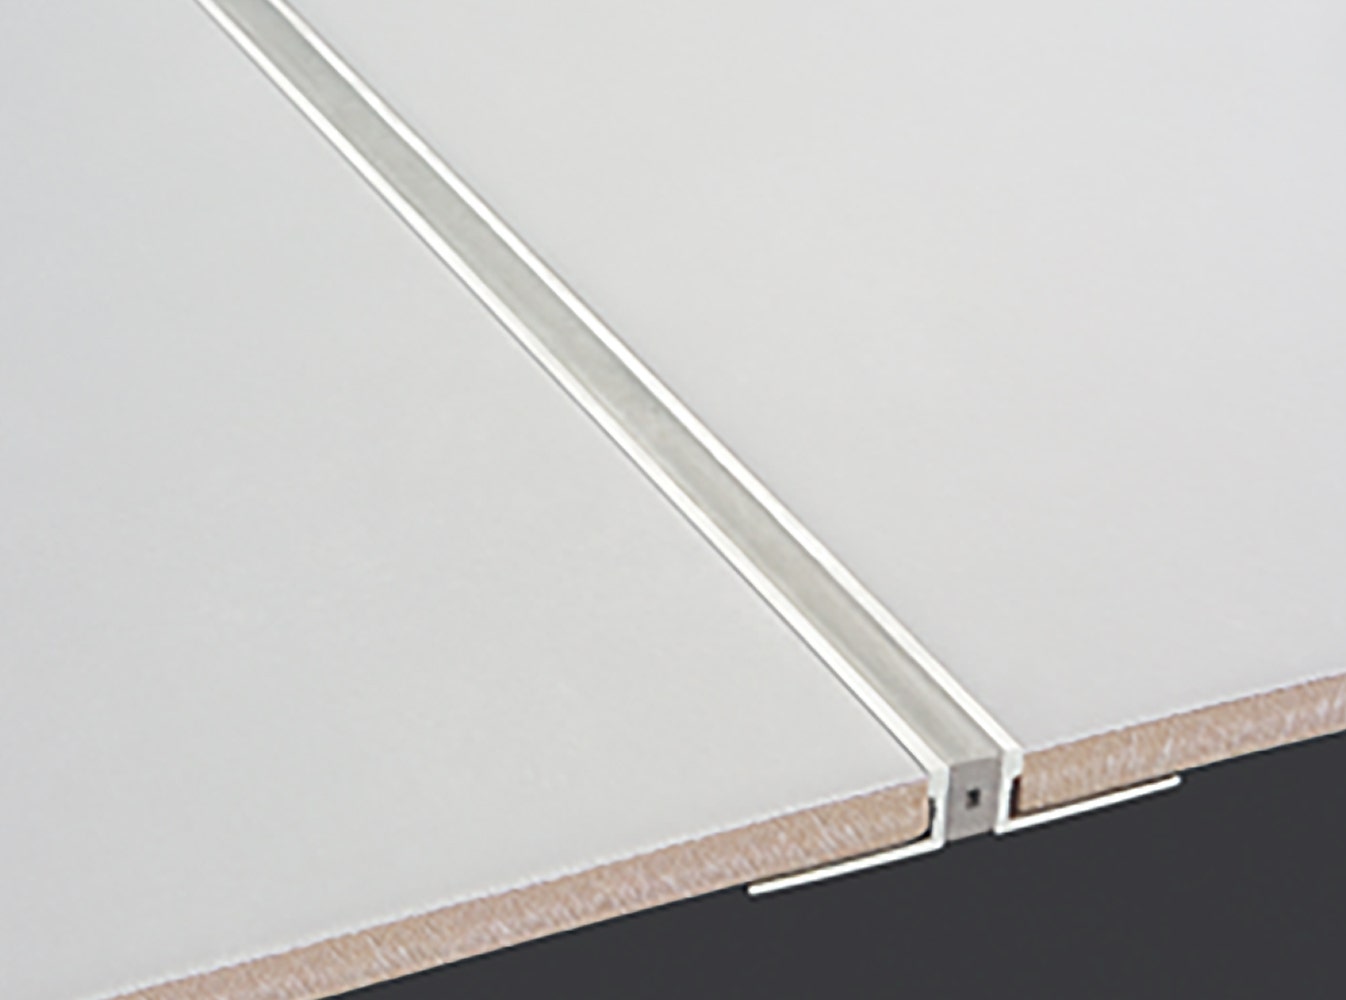
- Movement joints must go right through the tile and adhesive bed to the substrate background and be kept free from dirt and adhesive droppings.
- Joints shall not be less than 4mm and not greater than 10mm wide.
- Seal all movement joints with a suitable, expandable coloured silicone sealant to match your grout.
Our Hot Tip: We have a range of prefabricated expansion joints to suit larger areas if required. Check out our tools here.
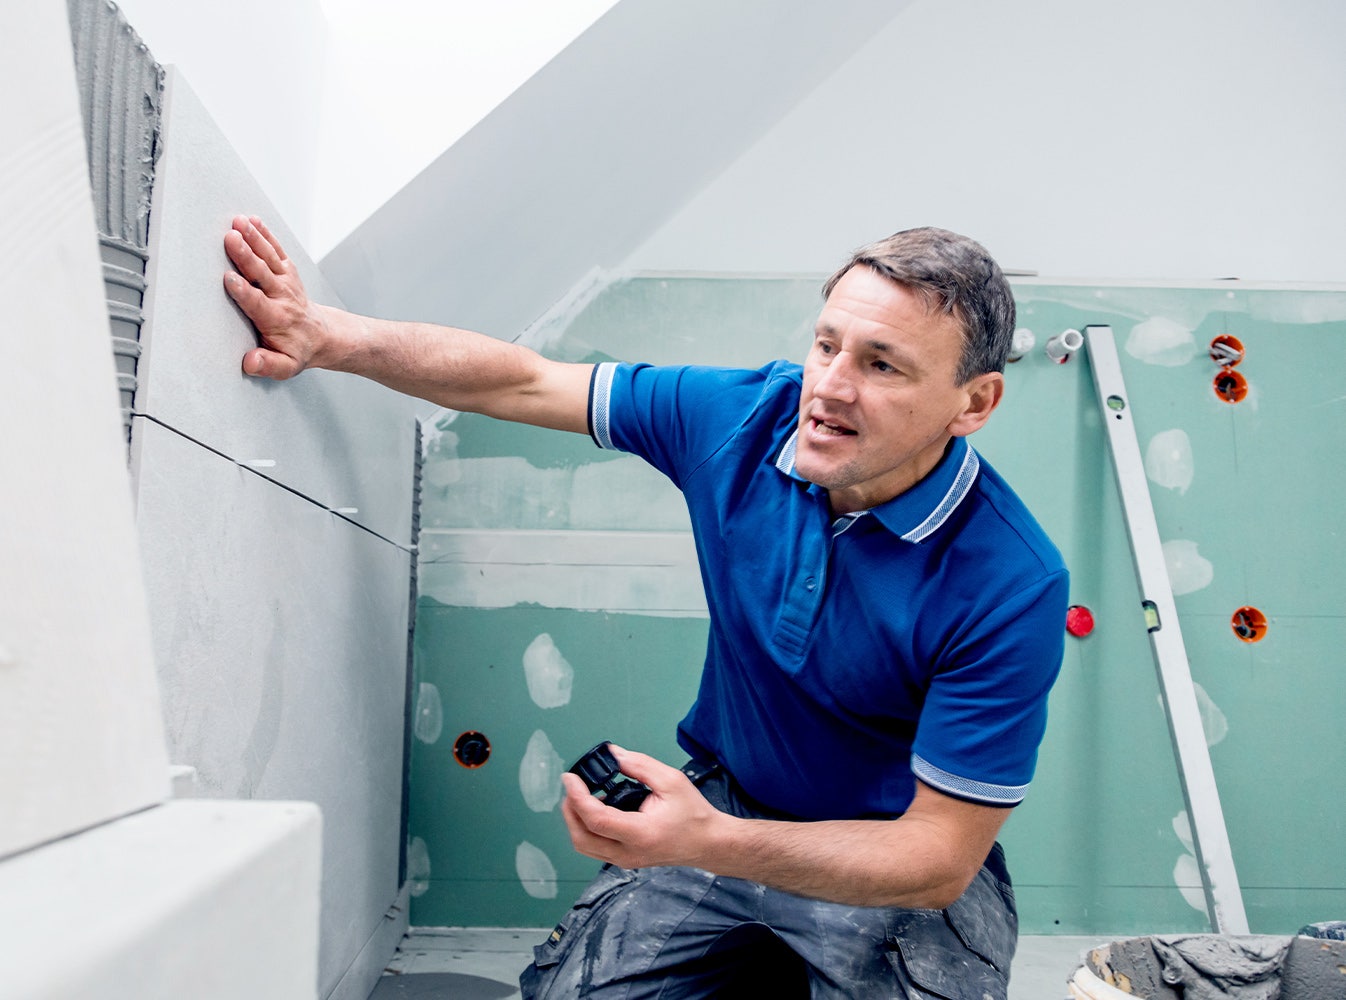
Setting Out Your Wall Tiles
Now you’ve decided on your layout, let’s get to it and start setting them out.
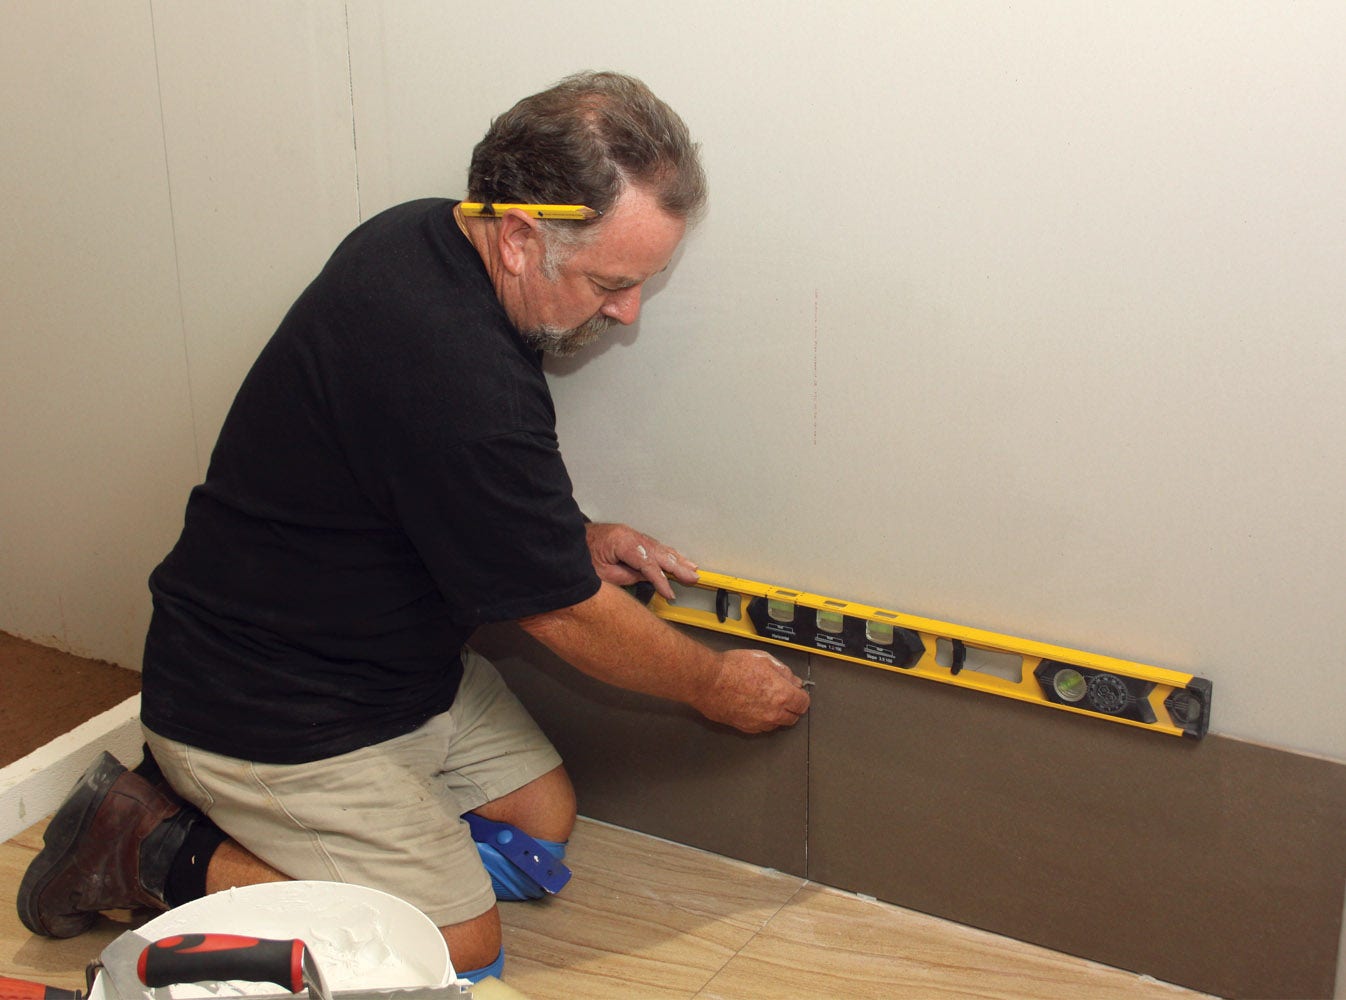
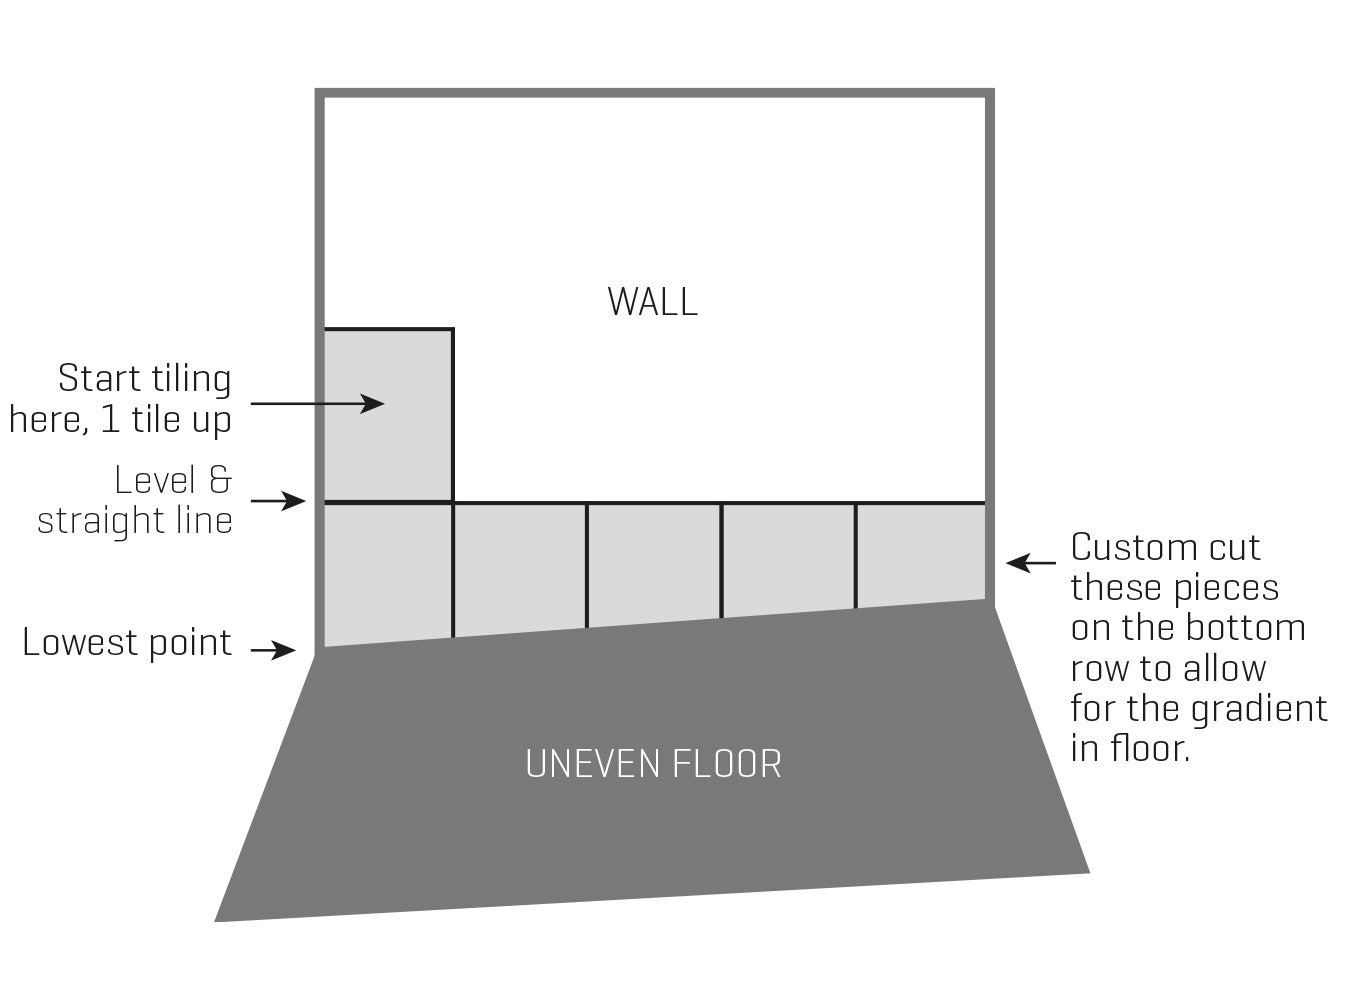
By using your spirit level, determine the lowest point of the floor against any wall, if it's a bathroom, it's usually one of the shower walls. Measure up one tile from this point, then rest a batten on jacks or blocks. If there is no waterproofing (you cannot pierce this membrane), temporarily fix the batten to the wall 20mm below this spot, making sure it is horizontal by means of the level. Continue this right around the wall and tile from this point, up.
Once you have tiled the floor, you can come back to this bottom row and tile the last row around the wall. Almost every tile in this row is cut to allow for the gradient in the floor.
If you are starting part way up a wall, e.g. above the bath, determine a starting point by measuring up from the base batten with tiles and fix another batten horizontally to the wall.
Before you commit yourself to a horizontal level, we suggest you mark around the wall where each horizontal tile joint will go and if you find it is going to be necessary to have unsightly small cuts in any places, e.g. above the bath or vanity, you can adjust the level to avoid this. It may mean a little extra cutting around the bottom row but is worthwhile. The golden rule is, try as much as possible to avoid small pieces of tile, or, try to keep them hidden.
The same basic idea applies to the vertical lines of your job. Try to minimise any small cuts. It is best to start with a centre line and mark along your wall where each vertical joint will occur. From this, you can ensure there won't be any small cuts on either end, up the edge of a window, or at the end of a bath. To make this setting out easier use your measuring rod, marked with the interval between each tile and move it across the wall until you can see the best layout can be achieved.
Take time to arrange your layout! If you start with a full tile at the base, the lean on the sidewall will mean you'll have to fill in several centimetres of tile at the top.
Our Hot Tip: Remember! Most houses rarely have perfectly vertical walls. Use your plumb bob to make a vertical line to follow to ensure your tiling is at right angles to the base.
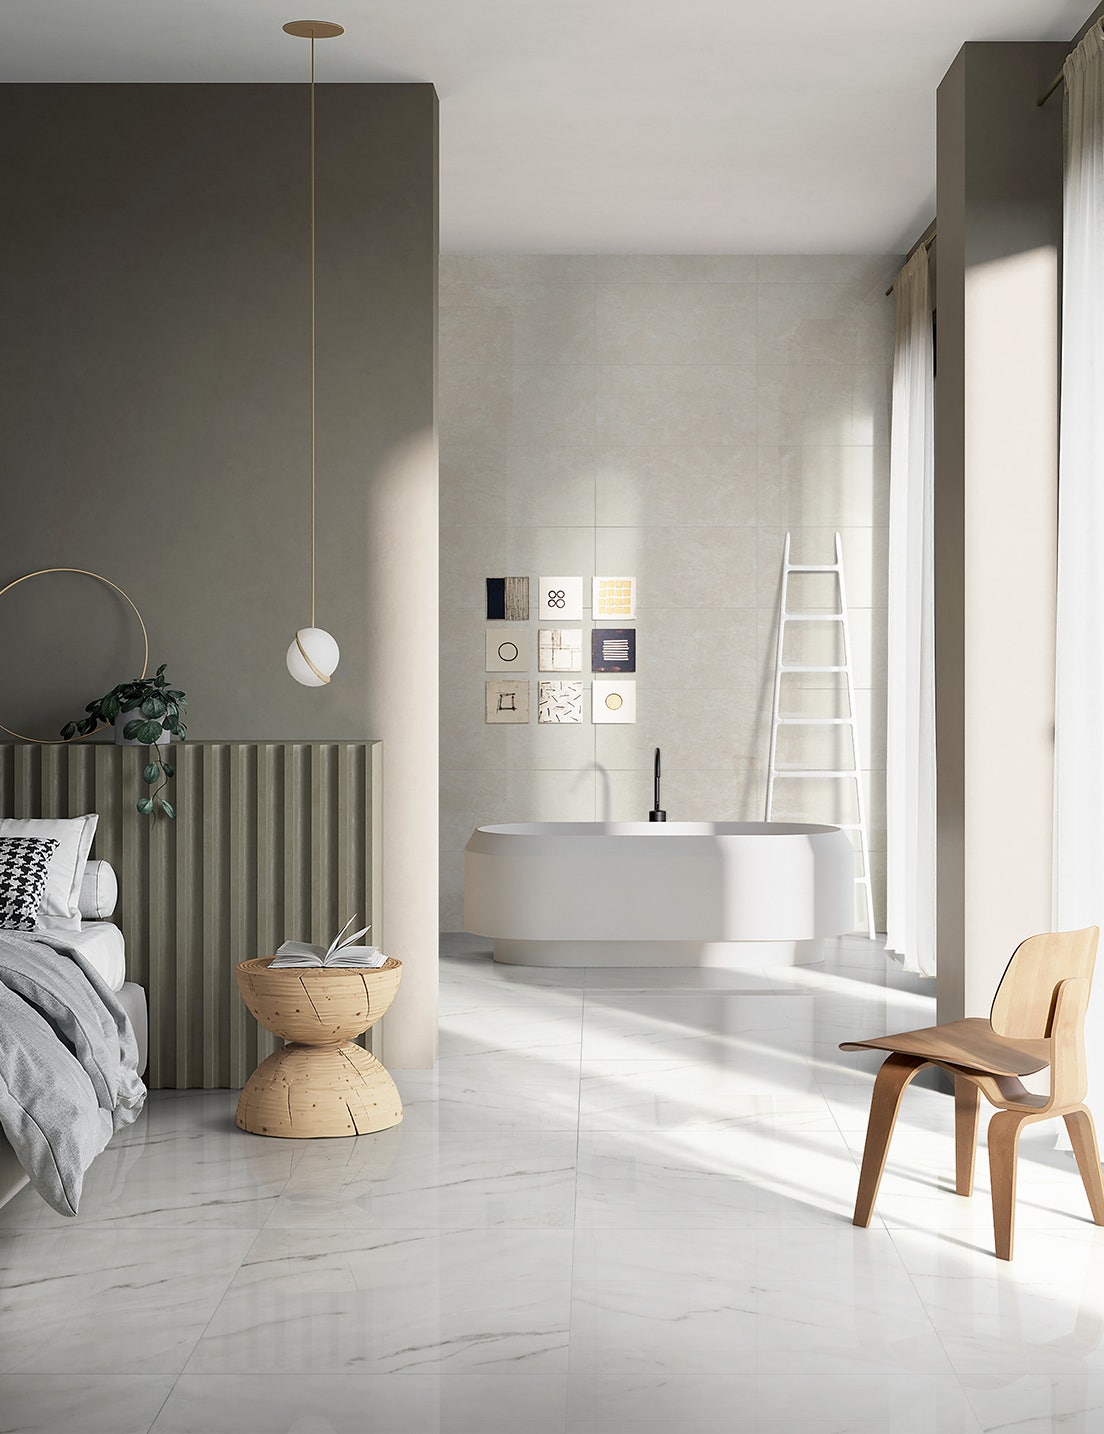
Setting Out Your Floor Tiles
For a start, work on the assumption that the area you are tiling is way out of square! Usually, it is best to have your full tiles in the doorway or in the case of a verandah – around the edge and have your cuts at the back of the area. In other words, set up your tiles so the cuts are in the least noticeable part.
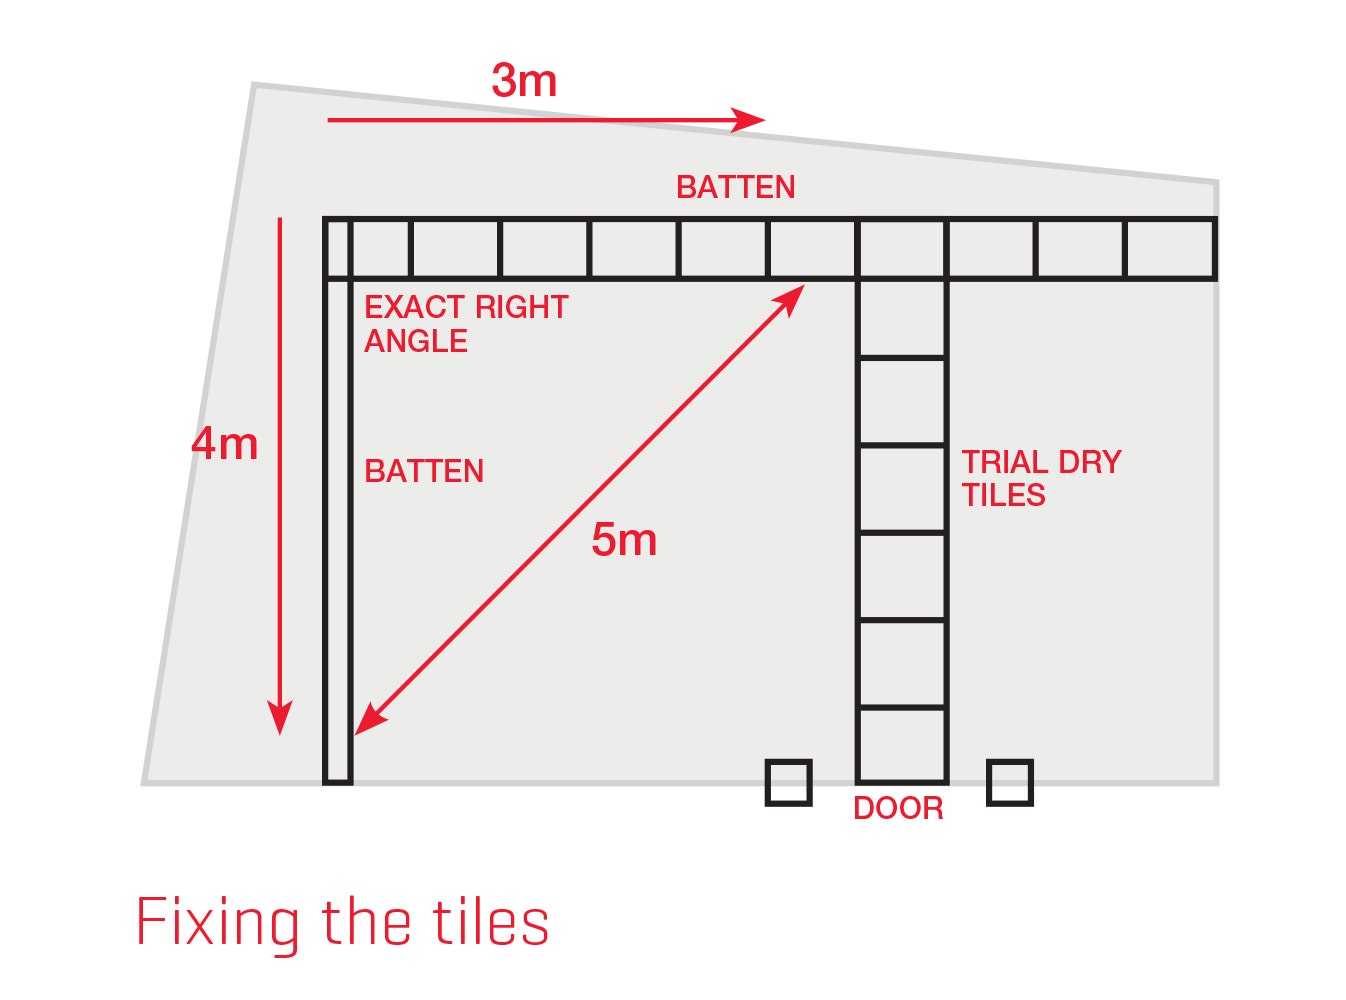
Establish centre lines in the room in both directions and mark them on the floor. Dry lay a row of tiles from the door, or wherever you want your full tiles to finish, with correct spacing (use your tile spacers), at right angles to the doorway. Mark the point where the last tile will finish. It is a good idea to mark on the floor, so you can keep an eye on how you are going. Nail a batten down right across the room on the last tile line (unless the floor is waterproofed as waterproofing can't be damaged), exactly at right angles to the row of tiles. Do not take any notice of what angle your walls may be because remember, we are assuming they are way out of square.
Dry lay tiles across the rear batten and determine where it will be best to start and finish, taking into consideration the best position for cuts and if your side walls are splaying out or in. Simply ensure there will be as few small cuts as possible. Mark the joint positions on the rear batten, then nail another batten exactly at right angles to it, near the left wall on one of the joint lines. This makes the corner in which to start your tiling.
NOTE: It is vital your angle is 90 degrees, otherwise you will be in more strife than you can poke a stick (or batten) at. It is simple to check by using the following method; Measure 3 metres along one batten and mark. Measure 4 metres along the other batten and mark. This distance between the two marks should be exactly 5 metres. If not – you do not have a right angle.
This all seems like an awful waste of time when you are impatient to get on with your tiling, but it is very important as you can see from our exaggerated diagram.
Our Hot Tip: Our DIY experts have created a super handy DIY guide that will be your best friend throughout your DIY journey - click here to download.
Our Hot Tip: Don’t assume your area is always square and take the time to ensure you achieve a 90-degree angle.
Setting Out External Areas
Our preferred surface for exterior tiling with either tile or natural stone is a properly prepared, dried and cured (for 28 days minimum) concrete slab.
The Australian Standard AS3958-2023 states that setting out should be related to siting of movement joints. Movement joints should be placed at locations where stress might be reasonably expected. Unfortunately, these requirements are often ignored due to a focus on aesthetics. Concrete and tiles will always experience minute movements such as expansion and contraction due to temperature changes, especially in an outside area subject to extreme weather conditions so the layout should always be planned in relation to the movement joints.
Firstly, any movement joints built into the substrate or joins between different areas cannot be bridged by tiles; the join must be carried through to the tile surface. As exterior tiled areas must perform under a wide range of environmental conditions including extreme summer heat and cold winter. Movement joints must be incorporated into the tiles at no greater than 4.5 metres in each direction in a grid pattern. As most areas will not divide evenly by 4.5, it is best to be cautious and place movement joints at more frequent intervals.
Plan and mark the centre lines for the tiling layout in both directions, checking the centre line in both directions are at a 90-degree angle to one another (in the same way as you do when installing floor tiles). Mark where movement joints need to be incorporated into the tiling. These joints must be kept free from adhesive and grout and will be filled later with flexible caulking. Plan for any cut tile pieces to be kept as large as possible, avoiding small cut pieces. Where possible, keep cut tiles to the least visible areas. Test the tile placement and plan the position of your cuts by dry laying a row of tiles in each direction near the centre lines, including an allowance for the grout joints.
Our Hot Tip: Our Exclusive Microtec range allows you to take one beautiful tile from inside your house to your external area, giving you a seamless and stunning look. Explore our stunning Microtec range here.

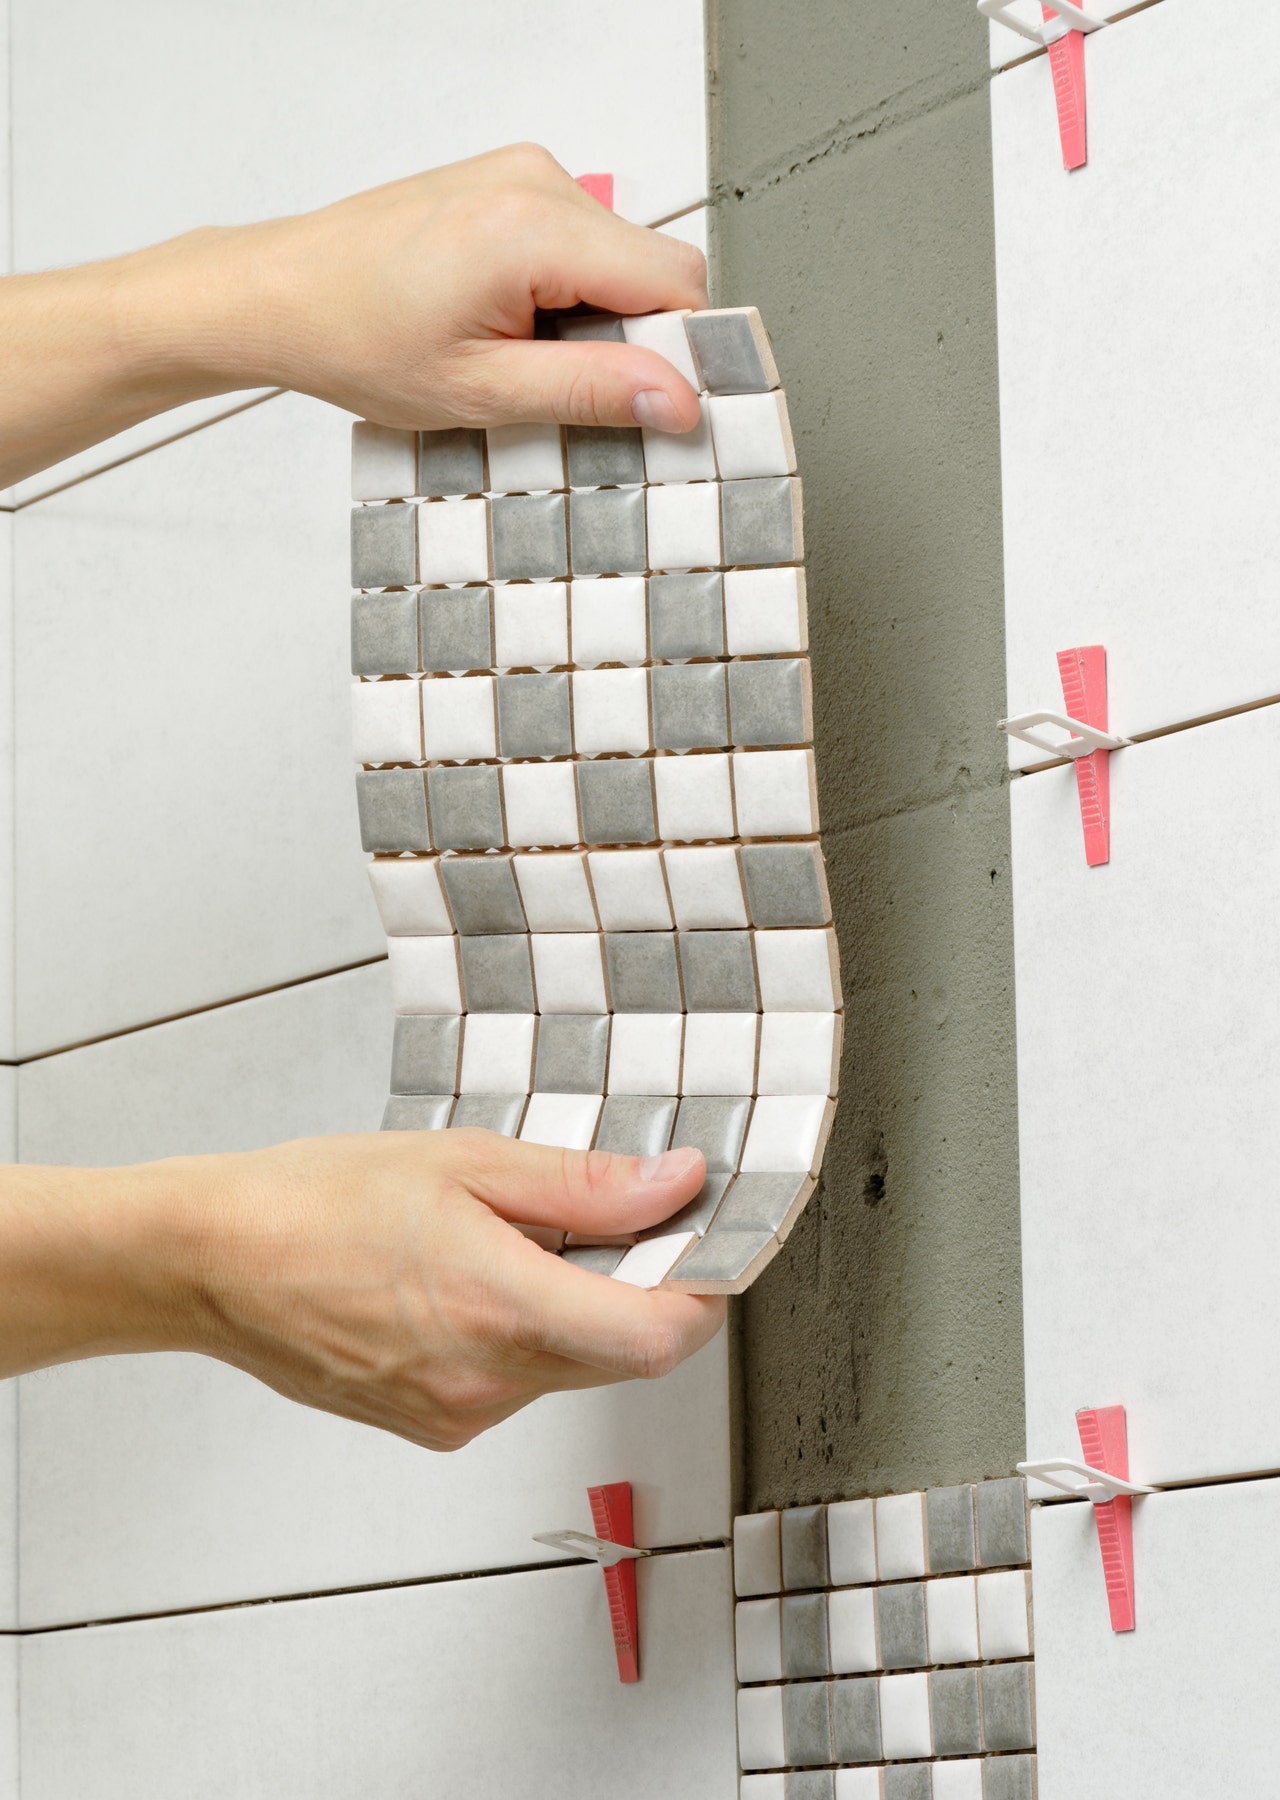
Setting Out Mosaics
A good mosaic tile project requires a well-planned layout to ensure that grout seams run perfectly square. Marking up the surface with suitably spaced horizontal and vertical guidelines will help.
Dry laying the mosaic sheets on a flat surface before installing will enable you to check the blend is acceptable and help with sheet pavement, especially if the mosaic colouring has significant tonal variation. Check that you have enough to complete the job as mosaics are produced in batches and there is no guarantee different batches will match.
Mark the centre line in the area to be tiled. Layout sheets from the centre line checking where the mosaic pieces will need to be cut to fit at walls, windows and doors, or around protrusions such as power points or taps. Most professional tilers start from the midpoint but this is not essential. It may be easier to start from the closest edge. Determine the easiest place to start to ensure as few small cuts as possible are used.
It is important to keep mosaic joint lines straight so mark vertical lines onto the substrate at the width of each mosaic sheet from the starting point to provide a visual reference when installing. Determine the height of the first mosaic sheet and mark the top of the first row onto the substrate, allowing for a tile spacer that will be placed under the bottom mosaic sheet to allow a gap for a silicone joint later. Further horizontal lines may be marked up the wall at intervals. You may also use a string line to assist with horizontal levels when installing tiles and a plumb bob for checking vertical joints.
If you require part sheets, the mesh can easily be cut before installing using a knife with protective gloves, or even scissors.
"What is a plum bob?", I hear you ask.
A plumb bob, or plummet, is a weight, usually with a pointed tip on the bottom, suspended from a string and used as a vertical reference line, or plumb-line. ... The instrument has been used since at least the time of ancient Egypt to ensure that constructions are "plumb", or vertical.
Our Hot Tip: Our mosaic range will get your creativity going! Check it out here.
Tiling Around Windows, Doors And Corners
When tiling around windows and doors, keep your tile joints level on either side. Check with a spirit level and string line or your layout lines marked on the wall. If the window or door is located in the main viewing line, cuts are best to be symmetrical on either side of the opening. In less visible situations ensure joint lines are level with the rest of the wall tiles and any cuts are kept towards the back or to the least visible side if possible. Try to keep all cut pieces as large as possible.
Special tiling trim mouldings are an excellent way of hiding cuts, especially at external corners. Tiling trim is available in metal and PVC in a full range of colours.
We cannot emphasise too strongly the need for setting out your job properly. Be prepared to give a few hours thought and experimentation with dry tiles before starting your job, as it will determine very greatly the finished look of your job. You can also check and adjust the position to achieve an acceptable blend of any pattern or shades within each tile.
When Tiles Meet The Ceiling
When tiling to the ceiling, measure the tile to be cut and allow a gap between the top of the tile and the ceiling for a flexible joint such as caulking or silicone. It is best to paint the ceiling first as paint will not stick to silicone. It is important not to fill this gap with grout as it will only crack later. The silicone at the top of the tiles will act as a movement joint as the ceiling is likely to move over time due to steam and heat.
If the ceiling is not exactly level, you will need to measure and cut each tile to fit, keeping the joint width the same.
Our Hot Tip: If the ceiling is very uneven, you may find it easier to finish the tiling 75mm below the ceiling and paint the top of the wall.
When Tiles Meet A Carpet Area
When tiling meets a carpeted area you have to take the height of the different flooring materials into account and make sure that the edge won’t turn into a potential trip hazard.
A ‘T’ or ‘L’ angle aluminium strip which protects the tile edge and finishes the tiling neatly is a good option if the finished heights of the two surfaces are the same. If there is a thickness difference between the tiled and carpeted area, a transition strip that removes the trip hazard will be required.
Beaumont Tiles has a wide range of trims to suit.

Grout Spaces With Tile Spacers
Grout adds both a functional and decorative element to any tiling job. In a nutshell, it fills the slim lines between tiles, helps hold your tiles in place and prevents water penetration.
Tile spacers are a fantastic way to ensure your grout lines remain straight and even and are available in different sizes from all Beaumonts stores. They are available in various sizes, for 1.5mm, 2mm and 3mm width joints. They are not embedded in the grouting but are placed with one arm placed in the gap between the tiles during installation to consistently space each tile and ensure gaps remain constant until the adhesive sets. All the spacers must be removed once the tile adhesive has dried and prior to grouting.
Our Hot Tip: We supply all the grout spacers you'll ever need! See our range here or pop into your local Beaumonts store.